Page Last Modified On: October 28, 2021
Discontinued - 2019
After carrying the torch for the Stokemonkey system for the past 8 years we felt that this product had finally run its course. For those wanting an after market mid-drive conversion kit there are now countless options available making the unique Stokemonkey approach with limited frame compatibility less desired.
Fortunately the hardware for the Stokemonkey is all very open standard and readily available, so it will be no problem to continue supporting customers who have these systems well into the futures. For most cargo applications where we might have suggested the Stokemonkey in the past, we would highly recommend having a look at the GMAC kit.

The Stokemonkey is a mid-drive conversion package originally developed by Clever Cycles in the early 2000's for tackling the steep hills of San Francisco with a Cargo Bike. While many newer incarnations of mid-drive ebikes and kits have taken shape since then, the Stokemonkey continues to fill a unique need. Its use of a low RPM hub motor provides smooth operation with minimal chain noise, and its exclusive use of regular bicycle hardware for gearing makes it hackable and serviceable without any proprietary components.
The original Stokemonkey was discontinued in 2011 due to parts supply issues, but we've been able to work with Clever and bring this coveted product back through an updated supply chain. In the process we have moved to provide lighter and more efficient motor choices, better waterproofing, and a universal clampset design.
Basic Operation
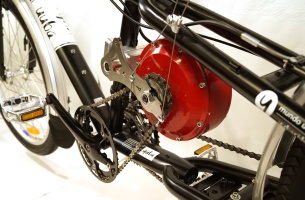
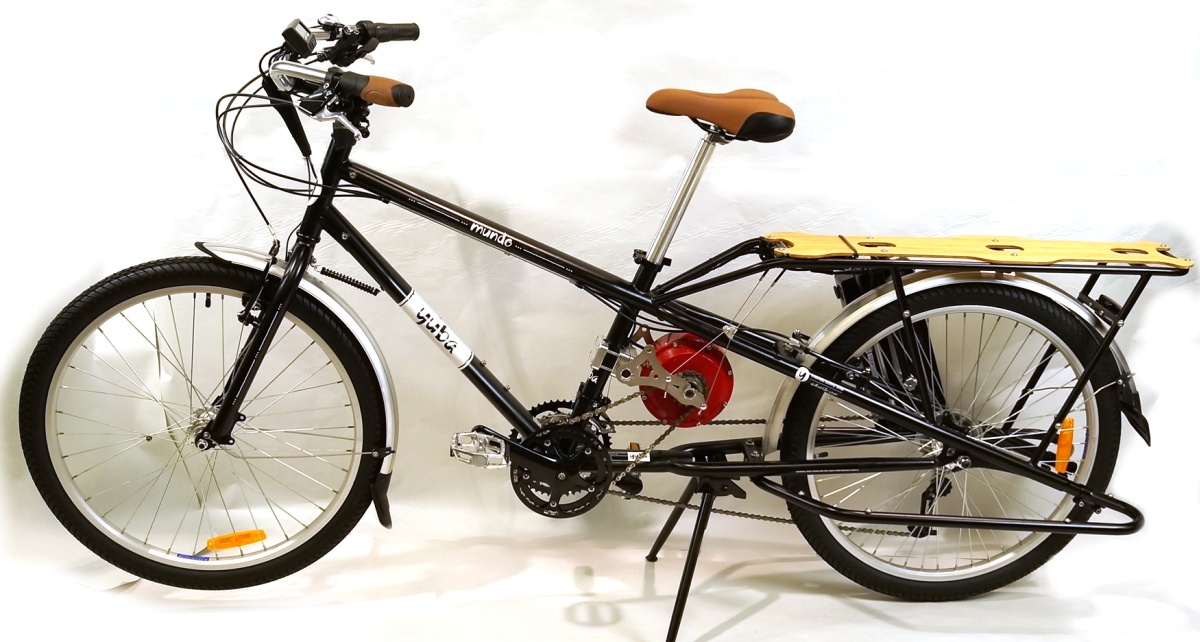
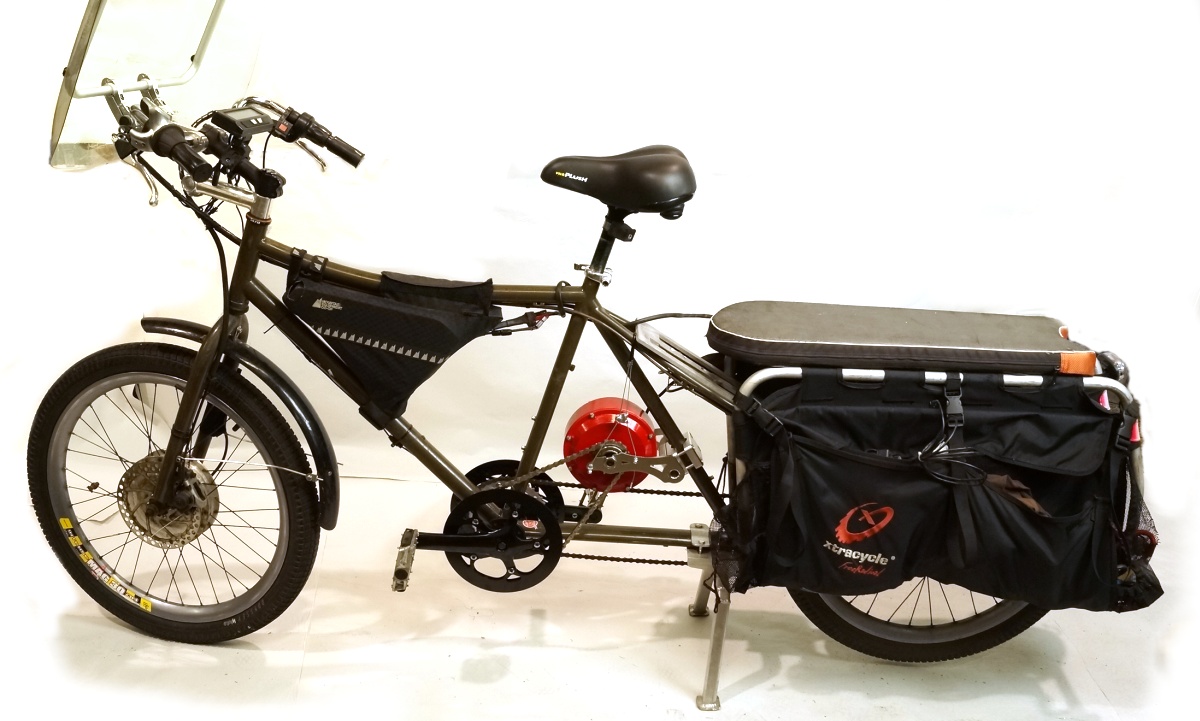
The classic Stokemonkey design uses a modified rear hub motor with a single speed freewheel on the left side to turn a tandem crankset. This arrangement is elegant and simple, and if the motor RPM is adjusted to match the rider's cadence then as the rider changes through the gears the motor stays in an optimal RPM range for best efficiency. Although originally intended for longtail cargo bikes based on the Xtracycle kit, the mount is flexible enough to work with a range of other cargo bikes like the
Yuba Mundo and
Big Dummy, as well as front loaders like the
Bullitt and
Cetma.
Motor Choice
At the moment you have the option of either a direct drive Crystalyte SAW motor, or the geared G02 motor. The SAW motor from Crystalyte is in the same spirit as the original stokemonkey motors. It is rugged, a little heavy (5kg), and can take a fair bit of abuse before overheating. However, it also requires the use of a single speed freewheel to drive the motor chain, and when you pedal the bike without the motor this freewheel will make a familiar clicking sound.
The G01 geared motor option is based around a conventional geared front hub motor where a 16 tooth cog is bolted on to the disk mount. Much like in a hub motor application, the internal gear reduction allows the motor to produce more torque in a package that is smaller in diameter and 33% lighter than the SAW motor at just 3.3kg. With the fixed cog, the motor still spins when you pedal the bike unassisted, but the internal clutch means that there is no drag and also no clicking sound coming from the motor when you are just pedaling. The downside of the geared motor is in the small audible gear noise when the motor is running. It's not much, but for the quietest opration when powered the direct SAW motor is a better choice.
Clampset Selection
The motor attaches to the bicycle with a clamplet typically secured to the seat tube of the bicycle. The motor bracket needs to then pivot inside this clampet in such a way that it can apply tension to the chain. We have a universal clamp option with 'V' grooves which can work on most bike tubes up to 30mm in diameter, but on these larger tubes there is a risk of creating four flast spots on the tubing if the bolts are overtightened. Therefore, we also offer clampsets that are CNC machined to specific tubing diameters, and carry in stock sizes for popular bike sizes like the Mundo, Big Dummy, Edgerunner, and Cetma. We can also custom CNC for other tube diameters for special applications.
Stokemonkey FAQ
Installation Guide
At the moment, we do not have a formal installation and user guide prepared for the classic stokemonkey kit. However most of the installation process is exactly the same as the original clever cycle's stokemonkey, and that is accessible through the web archives
here.
The only two significant differences that won't be obvious:
- The throttle plugs into the Cycle Analyst, rather than plugging into the controller.
- The new clampset works without any shims, but the suggested torque of 6.2 Nm on the 4 clamp bolts is too high for large diameter tubes and may risk denting them. It is OK for securing to the small diameter FreeRad, but for the Yuba, Big Dummy etc. we recommend just 2 Nm.
What are the differences between the Original and 2nd Gen Stokemonkey Systems?
Motor: The original Stokemonkey motor was based on the now discontinued Crystalyte 400 series hubs. The 2nd generation motors are based on a generic 154mm motor series that has similar power output, but has more motor poles (20 vs. 8) allowing it to achieve the same torque with 2lb less weight.
While the original Stokemonkey used a socket screw to hold the motor in the bracket, due to the thru-axle wire channel this was not possible with the newer models so we opted to use a narrow width nut and external threads. Both motors have the same 120mm axle length and fit in the same brackets.
Crystalyte did do a better job in the painting and surface finish, so you may notice paint chips around the side cover screws and some surface irregularity with the newer motors. These are cosmetic issues which do not affect performance.
Bracket: The bracket is stylized similar to the original but now includes a bracing support and an 8mm hole for an idler pulley. This way it accomodates both classic left-side-drive modes and the freewheeling right side configuration. It is is still 100% stainless steel and manufactured in Portland by the same facility that produced the originals.
Clampset: The clampset was reworked to use a 'V' shaped groove so that the one shape will fit a wide range of tube sizes without the need for shims. We supply 40,50,60, and 70mm bolts that provide a clamping range from 22mm up to 45mm. Unfortunately it is not quite large enough for the super oversized tubes used in some front loading Box Bikes like the Long John and many Bakfiets.
Controller: The kit now uses our dual sensored/sensorless infineon controllers with a pared down cable length. These are about half the size of the Crystalyte controllers used previously, and are much better waterproofed so there is no need to package them inside a mounting bag.
Cycle Analyst: The custom trimmed-down stokemonkey firmware that we had written for the original product is no longer compatible with the new CA boards. However, most of the features and many new ones are implemented in the V3 Cycle Analyst which is now included with the kit. Throttle: One minor difference is that the throttle now plugs into the Cycle Analyst rather than the controller. This enables much more control over the throttle response and signal range.
Will it fit on my bike?
If you have a Big Dummy or an Xtracycle Freeradical on a bike with a decently large rear triangle, then yes. The exact dimensional requirements for a Freeradical fit are
illustrated here. If you have a Yuba Mundo, then it does clamp to the seat tube but the front derailleur cable passes through the clampset groove and emerges at some angle. It is not ideal but seems to work fine. For front loading box bikes, it works if your tube diameter is 45mm or less. For larger diameters, we can custom CNC an updated tube clamp to match the diameter.
 Here is a link
 to a 1:1 scale side profile of the motor and bracket which can be printed and used as a template to see if it will fit. There are people who have done numerous unconventional installations, such as with the motor in the front triangle cavity of a regular bike, or drivng the jackshaft of a pedicab etc. With some mechanical inclination a lot of things are possible, but it's not something we can step you through if this kind of work is out of your comfort zone.
What length of Clampset Bolt do I need?
The following table shows the range of tube diameters that each of the 4 bolt lengths can accommodate.
| Bolt Length |
Tube Size (mm) |
Tube Size (Inch) |
| 40mm |
19 - 24 |
0.75 - 0.95 |
| 50mm |
25 - 31 |
1.00 - 1.22 |
| 60mm |
32 - 38 |
1.25 - 1.50 |
| 70mm |
39 - 44 |
1.53 - 1.75 |
What is the difference between running at 36V or 48V?
The stokemonkey motor winding was chosen so that at 36V it gives around 500 watts of power at a nice crank cadence with typical bike gearing. For most people this is perfectly fine, and is right in the spirit of the stokemonkey vision. However, if people want even more power from the motor then it is possible to run the system at 48V, and then increase the gear reduction accordingly to compensate for the faster motor RPM.
A 36V setup gives more battery selection options and is recommended for the most part, but to accomodate those wanting more power at the cranks we have a 50 tooth tandem chainring option better aligned for 48V setups.
Which Motor Winding? (8 vs 9 turn)
In addition, we sourced the motor in two different speeds to further let advanced users tweak their motor RPM and gear ratios. The 9 turn winding is standard and is similar in V/RPM to the original stokemonkey motor, while the 8 turn has a 15% higher speed for the same voltage for those who like a slightly higher cadence. The following table shows the resulting crank cadence at 80% of the unloaded motor speed for the different motor, chainring, and voltages.
Pedal Cadence (RPM) at 80% Unloaded Motor Speed for Different Setups
| | 36V pack | 48V Pack |
|---|
| 50 Tooth |
42 Tooth |
50 Tooth |
42 Tooth |
| 8 Turn Motor |
86 |
103 |
112 |
133 |
| 9 Turn Motor |
77 |
91 |
100 |
119 |
Can I install a regular right side chainring on the left?
At first glance it might seem that you could avoid getting a special tandem crankset by using a normal right side crank with chainring on the left. However, left cranks have a left handed thread for the pedals, and if you put a right side pedal on the left it will inevitably unscrew while riding and then strip the pedal threads. It may be possible to avoid this in a pinch by using a secure threadlock compound and doing the pedal exceptionally tight, if you don't mind permanently locking the pedal in place.
Can I use a torque sensor BB with the Stokemonkey?
Not easily. A torque sensor like the THUN bottom bracket measures the torsion across the spindle from the left side pedal force, and since the motor drives on the left side of the crank then the torque sensor will be measuring both the human AND motor torques. A similar problem exists with any chain force sensors like the
TDCM sensor or the
TMM device. However, you could use a THUN sensor in a stokemonkey style setup if the motor drove on the right side instead of the left side, as then the motor torque would be decoupled from the left pedal force.
Then can't I just install the motor with the sprocket on the right side?
This doesn't work because the standard freewheel on the stokemonkey motor freewheels the wrong way. In principle, if you had a left paw freewheel on the side cover then it would be possible, but that requires the side cover be modified with counterclockwise threads. We are looking into the possibility of providing this option.
Won't the flat sections of the clampset pinch the frame tubes?
It is possible to overtighten the clamp bolts and have the 'V' groove of the clamps somewhat deform the tubing, especially with large diameter thinner walled steel. For that reason we recommend tightening the four bolts to just 2 N-m. All the clampset needs to do is secure the motor bracket from twisting left and right, and a large clamping force is not required to achieve this.
Where to Order

 Canadian