PAS Options
Pedal Cadence and Torque sensors are a popular features on modern ebikes. They allow an ebike to deliver power automatically whenever you pedal without the need for throttle modulation. This guide explains the pedal and torque sensor options offered by Grin when choosing CA3 or Superharness kit from our website. It's meant to be a more practical and less theoretical treatese than this one here.
Basic PAS Sensors

The simplest type of pedal sensor just measures the pedal cadence. This is typically done with a magnet ring that attaches to the pedal crank, and a sensor that installs on the bike frame. The more magnets on the magnet ring, the less crank rotation is needed for the system to detect the pedaling and supply power.
PAS 12 pole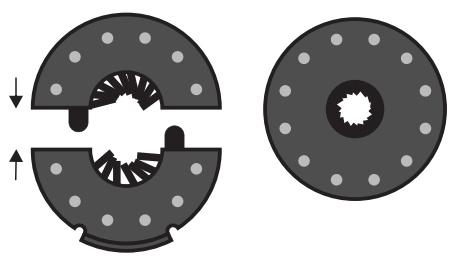 This basic PAS sensor fits on the exposed spindle of square taper cranksets. There are two magnet rings provided in this kit, one that is split in half with a snap ring and can be attached without removing the cranks, and a solid disk option that requires crank removal. The solid disk is more stable and is recommended if you have a crank tool, but the split ring provides a handy "tool free" PAS option. Both these rings can install on either the left or right side provided that you have at least 4-5mm of exposed spindle between the crank and the bottom bracket shell. If not, you can sometimes file or grind away the base of your crank in order to provide more clearance.
PAS 12 Pole, Chainring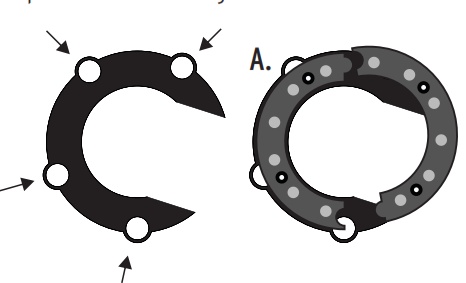 For bikes with hollow splined cranks and external bearings, there is no room to install a standard magnet ring on the spindle. For these setups, we offer a split chainring mounted magnet that fits over the 4 or 5 hole bolt pattern of the inner spider. In ideal cases the magnets will hold the device in place on the steel chainring or chainring bolts, but quite often additional tape or glue is required for a stable hold. In both 12 Pole PAS models, an external pickup sensor is attached to the seat tube or downtube with cable ties.
24 Pole PAS Mini Sensor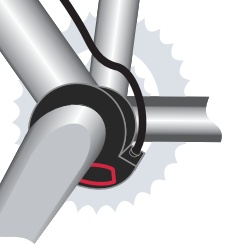 Unlike the exposed magnet ring sensors, the PAS Minisensor from King Meter is fully self-contained with both the sensor pickup and the rotating ring in the same compact housing. This makes for a cleaner installation without concern for sensor alignment issues. It also has 24 pulses per crank rotation, making for a super responsive PAS that engages the moment you start to turn the pedals.
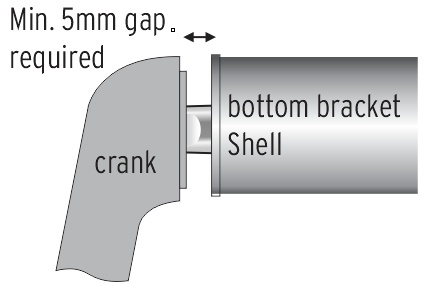
This is for sure our recommended PAS sensor, but it requires a full 5mm of exposed spindle and only works with square taper cranks and standard diameter bottom bracket shells.
How to Choose?
If you have square taper cranks with exposed spindle, use the 24 pole mini PAS sensor for the best response and cleanest install. For other cranksets or oversized BB shells, use the appropriate (chainring mount or spindle mount) 12 pole magnet ring sensor.
Torque Sensors

Torque sensing bottom brackets measure the force that the rider applies on the pedals in addition to their pedaling cadence. This enables pedal assist modes where the motor power varies in proportion with the rider's input power, something present in most of the higher-end ebike systems (eg Bosch, Shimano STEPs, BionX..) At the moment, nearly all aftermarket torque sensors are designed for threaded bottom bracket shells and use JIS square taper cranksets. If you have a press fit bottom bracket shell these won't work. Similarly, if you have a splined hollow spindle crankset then you'll need to replace your crankset with one meant for a square taper interface.
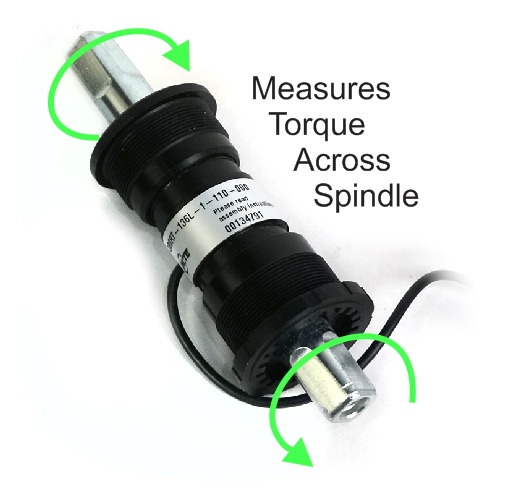 NCTE (Thun): The original stand alone ebike torque sensor was made for THUN by NCTE. This sensor measures the actual torque across the spindle. When you pedal with the left crank it registers a full torque signal, but when you are pushing with the right pedal the force goes straight to the chainring, it doesn't couple through the spindle. This has some unique advantages for certain mid-drive and tandem bike applications, but for most riders it means a delay in power assistance coming in if you start pedaling with the right leg. The delay is further compounded by the fact that these sensors only have the equivalent of 8 cadence pulses per revolution.
On the plus side, this style of sensor is very good at showing an accurate report of the human power in watts over any gear range and even at extreme pedal force, as it is a true linear torque measurement right up to 200 Nm. It is also easy to install, being mechanically no different than a standard sealed cartridge BB. There is also an ISIS splined option from NCTE, although we have had mechanical problems with them.
ERider: 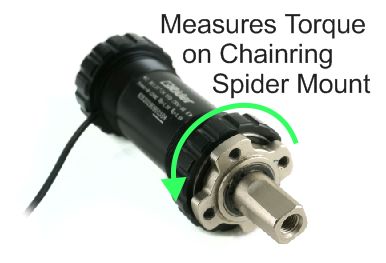 These sensors have a separate mount for the chainring spider that is independent of the right crank, allowing for accurate sensing of both left and right pedal contributions. They measure human torque and watts with good accuracy and the high pulse count (36 or 18 pole) cadence sensor allows for a rapid PAS power engagement at the start of pedaling. They also feature a cable exit on the side bearing cap so there is no need to drill a hole through the frame for running the cable passage. We've carried several models of ERider:
- First Batch: Our 2019-2020 stock had and 18 pulse single wire speed sensor and was for 68mm BB's.
- T9: This model had an 36 pole single wire PAS sensor, and was stocked in both 68 and 73mm BB sizes.
- T17: This is the model Grin currently stocks, and unlike the earlier versions it has 2 wire PAS encoding. This allows for reverse pedal rotation via the Cycle Analyst to activate back pedal regen. Plus we have it in 83mm and 100mm bottom brackets for fatbike frames.
All these models could be paired with either a 4 bolt spider with a 104 BCD, or a 5 bolt spider for 130 BCD chainrings. With these ERider torque sensors you cannot reuse the original cranks from your bike as the right crank has no chainring spider. We include a zero 'Q' factor Miranda cranks with each package that works very well and helps to offset the additional spindle length of this sensor design. You need to move the chainrings from your original crankset to the appropriate 4 or 5 bolt spider mount that came with the kit.
Fischler AG: 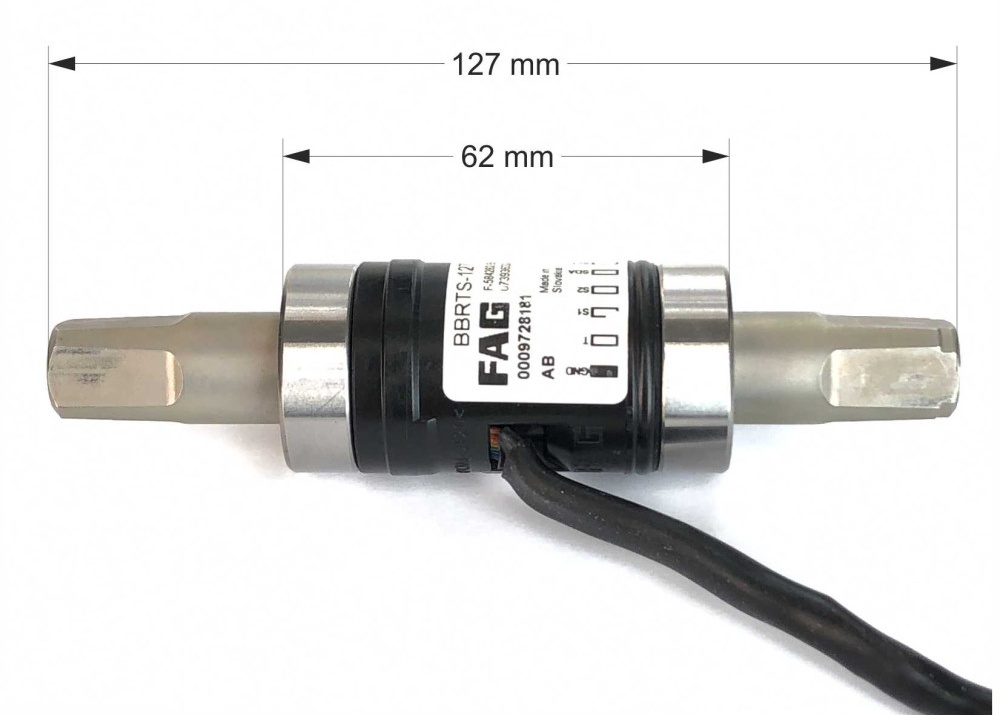 The Fischer sensor operates in a similar method as the NCTE devices with a magnetostrictive torsion sensing of the bottom bracket spindle. We received a large number of these from a liquidation event and reworked the flat ribbon cable exit to convert to our 6 pin HiGo plug standard. We only have them in a 68mm shell / 127mm spindle size, but luckily that fits OK on most bikes providing a great low cost and reliable torque sensor that lets you keep your original crankset.
This torque sensor requires drilling a fairly large (9mm or 3/8") hole in the bottom bracket shell.
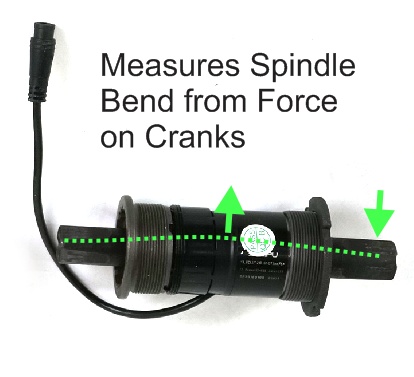 Sempu: The Sempu sensor also responds to both left and right pedal torques, but unlike the TDCM or ERider sensor it makes no attempt to isolate forces that put power to the wheel from all the other forces on the crank. Instead, it measures the general flex of the spindle and assumes that for the most part this will vary in proportion to how hard you are pedaling. In practice, this works surprisingly well. It also has 24 pole cadence sensor, 3 times more than the Thun / NCTE and twice the TDCM. These details make it by far the most responsive sensor for engaging immediately when you start pedaling from a standstill.
The Sempu installs almost as easily as a regular cartridge bottom bracket (see video here) and is available in non-standard bottom bracket sizes, with adapters for 73mm BB shells and also models for 84mm and 100mm wide bottom brackets used in Fatbikes. On the downside, we have seen a higher than normal issue rate (approx 20%) with the Sempu sensors throughout most of 2019 with the torque signal periodically dropping out, and are holding off ordering more of these until Sempu can assure that their QC problems are fixed.
TDCM: 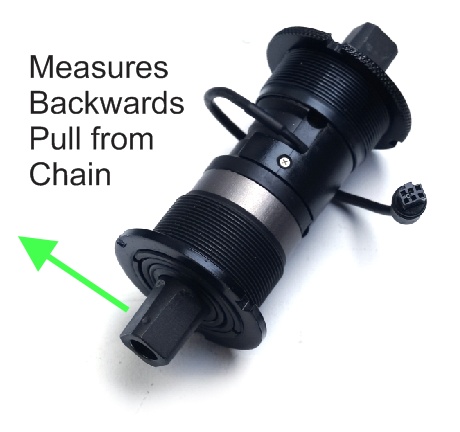 The TDCM sensor doesn't measure the torque on the spindle, instead it uses a clever arrangement with a slotted bearing support to measure how much the right side spindle flexes backwards due to chain tension. This allows the sensor to respond equally well to left and right pedal forces as they both put tension on the chain, while ignoring the downwards force which would only be present from the right pedal. It includes a higher 12 pulse cadence sensor helps it respond quickly to small pedal rotations.
Because the operation of this sensor requires an alignment in the direction of the chain tension, it involves a more detailed installation process taking care to read and follow the instructions. The output signal also saturates at the equivalent of about 50 Nm of pedal torque, which limits it's accuracy as a human power meter. But for the sake of providing proportional PAS assistance, this sensor works very well.
Availability Update: As of 2018 the TDCM has gotten out of the torque sensor business and these bottom bracket sensors are no longer available.
Spindle Length
All the torque sensing bottom brackets are available in a range of spindle length options. Even though the size of bottom bracket shells on bike frames is largely standardized to 68mm or 73mm, the exact location where the chainrings will line up can vary significantly between cranksets. Bicycle bottom brackets are produced in many different spindle lengths to achieve a desired chainline. 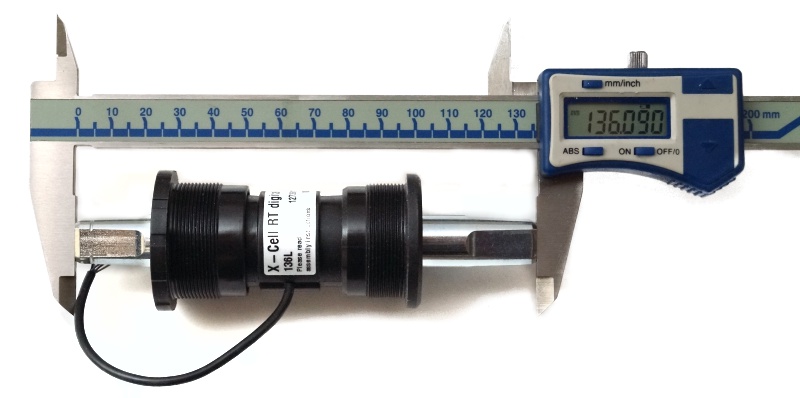 In order to determine which spindle length to get, just remove the cranks and measure with a caliper or ruler then select the closest match. Most ebike setups will use either the ~114 or ~120mm crank length options. A few mm longer or shorter does't matter much except with belt drives or frames having tight clearance between the chainring and chainstays. The longer 128mm and 136mm spindle options move the cranks even further away from the centerline. On certain ebike conversions this can be useful to provide more space between the cranks for frame mounted batteries or mid-drive ebike conversions.
Power Draw and High Voltage Setups
All the torque sensors are powered directly from the 10V bus on the Cycle Analyst's PAS plug which has limited current availability, especially at higher voltages. Setups using 52V nominal batteries or lower will be fine, but systems running at a higher voltage will need to have power to the torque sensor supplied externally rather than from this plug. Running a 72V system with a torque sensor directly connected to the CA's PAS input will very likely damage the CA and sometimes the torque sensor too. These details are explained in section 5.10 of the detailed unofficial CA3 user manual.
Cable Exit Hole Drilling
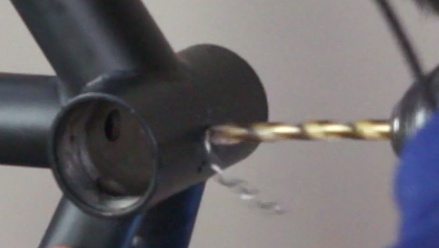 Most torque sensors require drilling a hole in your bottom bracket shell for the cable exit. The Ficher AG, Sempu, and TDCM sensors require a large 9-10mm hole to fit the molded connectors. The NCTE sensor can get away with a smaller 5-6mm hole as we supply the wire terminated just with the bare JST pins not yet inserted into the larger 5-pin JST housing. The ERider sensors have a convenient side cable that does not pass through the frame.
Do I really need a torque sensor?
This is a matter of personal opinion. Some people swear by it while others are perfectly happy with or even prefer a basic cadence PAS sensor, keeping the motor power independent of pedal power. The V3 Cycle Analyst allows for basic PAS sensors to vary the power in response to the rider cadence, which effectively emulates a torque response as most people spin the cranks faster when pedaling at higher efforts.
If you are new to ebikes and unsure whether to get a torque sensor or basic PAS sensor, rather than deliberating for days we normally recommend just starting off with the basic PAS device since they cost less and are easier to install. You can always upgrade to a torque sensor later if you feel that true torque control would be preferred once you have a better feel for how you use your ebike.
TL;DR: So Which One Should I Choose?
Our E-Rider T17 sensors are currently the primary go-to choice; we have them in a wide range of sizes (68, 73, 83, and 100mm BB's), they have a responsive 18 pulse PAS encoder, and they do not require drilling a hole in the frame for the cable exit. On the downside, the chainring spider is part of the sensor and so a special crankset is required. As well we have had some issues with the torque signal occasionally dropping out from electrical noise interference from the motor, especially during regen. That can usually be remedied with an optional grounding of the bike frame.
NCTE and Fischer AG sensors only measure the torque from the left pedal crank, and they require a hole in your bottom bracket for the cable exit. However they also let you keep your original square taper crankset and have been electronically quite reliable. Plus the Fischer AG is a great deal.
| Sensor | BB Shells | PAS Poles | PAS Type | Signal Range | Effective Torque Scale | Torque Range | Measure | Sensing | Grin Availability |
| ERider T17 | 68,73,83,100mm | 18 | 2 Wire | 1.5V-3.3V | 70 Nm/V | ~ 110 Nm | Chainring Torque | Both Cranks | Available |
| Fischer AG | 68mm | 18 | 2 Wire | 0.6V-4.5V | 50 Nm/V* | + 200 Nm | Spindle Torque | Left Crank | Available |
| ERider T9 | 68,73mm | 36 | 1 Wire | 1.5V-3.3V | 70 Nm/V | ~ 110 Nm | Chainring Torque | Both Cranks | Discontinued since 2022 |
| NCTE | 68mm | 16 | 2 Wire | 2.5V ± 2V | -200 Nm/V* | ± 200 Nm | Spindle Torque | Left Crank | Out of Stock |
| THUN | 68mm | 8 | 2 Wire | 2.5V ± 2V | -200 Nm/V* | ± 200 Nm | Spindle Torque | Left Crank | Discontinued since 2017 |
| Sempu | 68,73,84,100mm | 24 | 2 Wire | 1.5V-3.5V | ~50 Nm/V** | ~ 100 Nm | Spindle Flex | Both Cranks | Discontinued since 2021 |
| TDCM | 68mm | 12 | 2 Wire | 2.5 - 3.3V | ~50 Nm/V** | ~ 60Nm | Chain Tension | Both Cranks | Discontinued since 2018 |
CA3 Aux Input Devices
In most ebike setups running a PAS or Torque sensor, you'll want to adjust the assistance level from the handlebars without needing to navigate into the Cycle Analyst setup menu. This is done via the white Aux Input plug on the Cycle Analyst, with either the analog potentiometer or the digital button device.

The analog potentiometer option provides an infinitely adjustable control from zero to maximum assist by turning a small thumb knob on the handlebar. The digi-aux option uses a pair of up/down buttons allowing you to increase or decrease the assist in fixed increments. Both options work fine, but most people prefer the digital setup using reproducible fixed levels instead of a continuous adjustment of a dial. All of the Ready-To-Roll kits include an up/down digi aux bottom assembly in the multifunction CA3 switch.
In the Cycle Analyst setup menu, you will also want to set the appropriate AuxA->Function or AuxD->Function in the Cycle Analyst setup menu to "PAS Level" to have it control the level of pedal assistance.
Cycle Analyst Setup
Some people express intimidation at the idea of setting up the Cycle Analyst for their torque or PAS sensor. We would normally supply a kit with the CA already configured, but it's worth understanding how the Cycle Analyst settings work for any tweaking and troubleshooting, and it's really not all that difficult.
Setting up Basic PAS sensors with CA3.1 Firmware
The basic PAS sensors from Grin all have 2 signal wires that capture the pedal rotation and the direction of rotation. If you go into the setup menu on the screen that says "SETUP PAS DEVICE", you'll see a preview of these signals as the P and D arrows on the 2nd line. As the crank is rotated, both of these arrows should toggle up and down in sequence. If they don't, you have a hardware problem to resolve first.
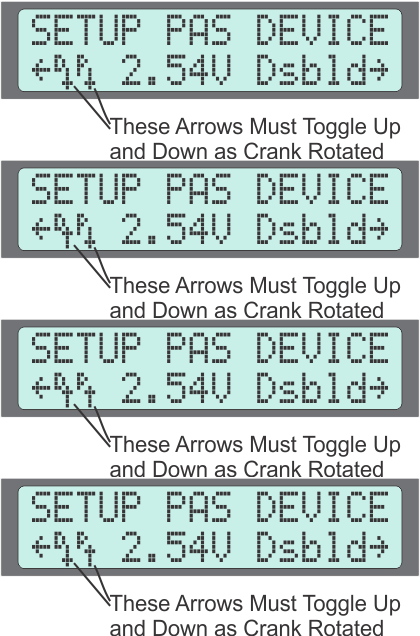
 Sensor Type: For a basic PAS sensor, you want to set this to "Basic PAS".
 PAS Poles: This is the number of times the P arrow toggles up and down for a full rotation of the cranks, and is used by the CA3 to show an accurate figure for your pedal cadence in RPM. It should be set to 12 for the 12 magnet sensors, and 24 for the 24 pole mini PAS sensor.
 Signal Type: For most of the Grin supplied PAS sensors, this should be set to 2 Wire mode since both the 'P' and 'D' signals are active. The ERider sensors have the more common 1 wire mode with only 'P' toggling.
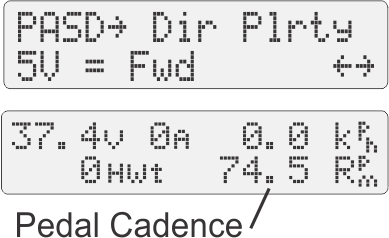 Direction Polarity: The correct setting for direction polarity depends if the sensor is installed on the left or right side, so setting it can be a matter of trial and error. The 3rd screen of the Cycle Analyst shows the pedal cadence. If you see 0rpm when you pedal forwards, but an actual RPM value when you spin backwards, then it simply means the direction polarity bit needs to be swapped.
The "SETUP PAS CONFIG" section of the setup is where you configure how the CA3 responds to the PAS sensor.

 PAS Mode: For most situations, this should be set to Basic PAS (Pwr). In this mode, when you are pedaling the Cycle Analyst will be adjusting the throttle signal to maintain a constant power to the motor, even as you speed up and slow down. (On CA3.0X firmware, this setting is called AutoPAS)
 Start Level: This is the power that the system will produce whenever you are pedaling. If you are using an auxiliary input to adjust the PAS levels on the fly, then it represents the maximum power you'll have at full assist. It's common to have a PAS power that is noticeably less than the maximum power of the ebike, and then the throttle is used whenever full power is required.
 Scale Fctr: This setting allows you to scale the PAS power output in proportion to your pedal RPM. It should be set to zero if you want a fixed power that doesn't change with the pedal cadence. If you want the power to increase as you downshift and pedal faster, then settings from 2-10 watts/RPM can provide a nice boost in response to the cadence change from harder pedaling.
Setting up Torque Sensors with CA3.1 Firmware
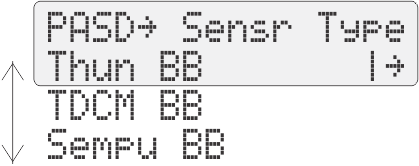
The V3.1 Cycle Analyst has a preset configuration for the Sempu and THUN/NCTE sensor. In the setup menu for the PAS Device Sensor Type, you simply choose the appropriate sensor from the drop down menu.
That will preconfigure the #PAS poles, direction polarity, torque scale, and torque offset to sensible values. The ERider sensors do not have a preset in the CA firmware and should use the custom setting with 36 PAS poles, 1 Wire sensor type, 5V = Fwd, and 70 Nm/V .
When the PAS device is configured for a torque sensor, the preview screen will show the voltage coming from the torque sensor along with the associated torque value in Nm. With no force on the cranks you should see around 0 Nm (+- 2Nm is fine), and when you apply pedal force this number should increase into the many 10's of Nm as illustrated below. If you do not see the sensor voltage and Nm increase like this with force on the pedals, then there is a problem with the installation or your device settings that needs to be resolved before Torque PAS will work.

Torque PAS Config The configuration for a torque based PAS mode is different than the basic PAS modes. The CA looks at both the torque and crank RPM to compute the rider's mechanical input power, and then uses this to scale the output motor power.
 PAS Mode: This should be set to Torque in order to have the motor power vary in proportion to pedal force.
 Start Level: With the CA3.15 and earlier firmware, this setting is the baseline human power that the rider needs to supply before getting any power output from the motor. It can be handy to set this to around 100 watts if you don't want motor power with leisurely pedaling efforts. If you want the motor to exactly scale the human power even at minimal pedal force, then this should be set to 0 watts. With the CA3.2 firmware, this setting is the baseline output power of the motor when you are pedaling with zero torque, so the function and default setting is a bit different.
 Scale Factor: This setting determines by how much the motor power multiplies the human power at the max assist setting. For typical systems a max of 3 to 4 times is about right, allowing motor powers of ~800 watts when the rider is putting in 200 watts.
Advanced Cycle Analyst Tweaking
There are several other settings which in almost all situations are perfectly fine left at the default, but which can be used to tweak the PAS behavior.
PAS Mode: Basic (ThO): This is an alternative basic PAS mode where the Cycle Analyst is not attempting to do a fixed power output when you are pedaling, but instead commands a fixed throttle output voltage. On systems with standard PWM ebike controllers, it means the PAS level sets the approximate unloaded speed of the motor rather than the motor power, resulting in more power at low speeds and no power at higher speeds instead of constant power regardless of speed. On systems with torque throttles (like the Phaserunner) it allows the PAS level to set the actual motor torque.
PAS->Start Threshold: This is the time between the 'P' arrow toggling that tells the Cycle Analyst that you have started pedaling. The PAS signals must be changing at a faster interval than this for the motor power to engage. We recommend leaving it at the default value of 0.3 sec, but you can decrease the threshold time if you find that pedal assist engages too quickly, or increase it if you find that power is too slow to come on when you are pedaling slowly from a standstill.
PAS->Stop Threshold: This is the exact same thing as the Start threshold, but it is the time duration that applies only after the CA has established that you are pedaling at a normal cadence, with a default of 0.19 seconds. Pedal Assistance stops when this much time has elapsed without the PAS signal toggling. A lower value will result in a more immediate cutout of power when you stop pedaling, but it also requires you maintain a higher pedal cadence to keep PAS engaged.
ThrO-> PAS Ramp Rate: This setting allows you to have a distinctly slower throttle ramp up rate when the CA is responding to pedal rotation, while still having a faster immediate ramp up from the throttle. It can be useful if you still want a large amount of PAS power, but would prefer it to engage gradually rather than kicking in the moment you turn the cranks. Settings of 0.2 - 0.5 V/sec work well.
PLim->WGain: When the CA is in PAS mode, it is attempting constant power output and this makes use of the power feedback loop inside the CA. WGain is the tuning parameter for this loop. If it is set too high, the power application my be rough and oscillatory going above and below the target power, while a setting that is too low can result in a long delay before the target power is reached. The default gain of 15 works well over a wide range of ebike systems but can be too high for powerful setups.
PAS->Assist Average: This setting is only present in torque pas mode and allows you to set the amount of averaging present on the torque signal. By default it will be set to the number of PAS poles, so that the CA is averaging the torque over one full revolution of the pedals. Larger values will result in a steadier motor power output, while smaller values can result in a faster motor response to changing pedal force. However, the value must be either a multiple of the PAS poles (for NCTE / THUN) or a multiple of half the PAS poles for torque sensors that measure both left and right pedal force, otherwise there will be pulses of power with each crank turn. The TDCM sensor by example has 12 poles and senses left and right pedal force, so averaging values of 6, 12, 18, or 24 poles are all OK.


 Canadian